Cocoapods 管理开源项目
准备工作
在进行下面工作之前,请确保你做了下面三件事情:
1. 创建或者已经有了 github 账号.
2. 了解和熟悉如何在 github 上面创建 Repository.
3. MacOS 上面安装了 Cocoapods.
如果你还没有使用 Cocoapods, 建议看看 Mac OSX 10.11.1+ 安装 Cocoapods 这篇博客.
在博客 iOS 项目: 打造本地 pod 库 里面有介绍如何打造本地的 pod 库,不需要借助任何仓库就可以完成,操作简单,适合项目组内使用。
今天给大家分享如何将代码开源并放到 pod 库中,供别人使用。这种方式属于打造公共(Public repo)仓库, 任何人都可以搜索到你贡献的库并使用你的库。后面会跟大家分享如何打造私有(Private repo),敬请期待。
这篇博客是基于一个实际例子 MZInsetLabel 来说明的,期待与优秀的你交流讨论。
创建 Repository 并完善项目
1. 在 Github 上面创建 Repository,取名为 MZInsetLabel.
2. 将该工程 clone 到本地磁盘.
3. 写代码,这里我只写了 MZInsetLabel.h | .m 文件.
4. 创建 podspec 文件.
使用下面命令,即可产生该文件。
1 | pod spec create MZInsetLabel |
在当前目录会生成 MZInsetLabel.podspec 文件。按照文件规范和实际情况填写即可,如果不知道怎么填写,可以在 Github 上面找一个开源项目参考即可。
注意: Tag 版本号不要错误.
最终内容如下:
1 | Pod::Spec.new do |s| |
项目检测
检查该 podspec 文件,执行下面命令
1 | pod lib lint MZInsetLabel.podspec |
–verbose 可以输出更加详细的内容
1 | pod lib lint MZInsetLabel.podspec --verbose |
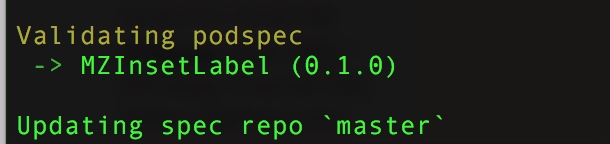
正确的话, 你可以看到下图如所示的内容:
在检测的过程中,如果有一些警告导致无法验证通过,可以使用 --allow-warnings 参数规避这些 warning,但我还是建议大家尽量将 warning 修改好。
1 | pod lib lint --allow-warnings |
pod lib lint *.podspec 是只从本地验证你的 pod 能否通过验证.
pod spec lint*..podspec 是从本地和远程验证你的 pod 能否通过验证.
大家可自行选择这两种方式。
添加项目到 Github Repository
将本地的代码 push 到 Github 的 Repository, 就是刚才创建的 MZInsetLabel.
1 | git add `文件`或者`文件夹` |
在你的 Github Repository 上面创建一个 Release 作为 Tag(0.1.0版本),如图所示: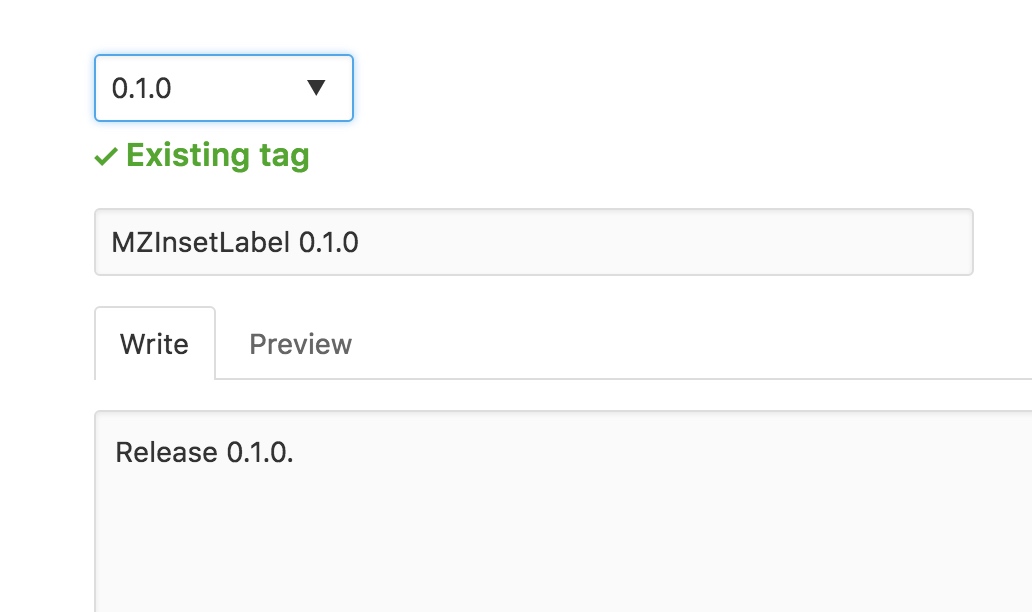
推送到 cocoapods
1. 注册 trunk
pod trunk register 你的邮箱 ‘用户名’ –description=’简单描述’
完整命令如下:
1 | pod trunk register veryitman@126.com 'veryitman' --description='mark' |
2. 打开邮箱, 激活邮件, 点击链接激活
3. 检查注册信息
执行命令如下:
1 | pod trunk me |
4.添加到 cocoapods
执行下面命令, 即可.
1 | pod trunk push MZInsetLabel.podspec |
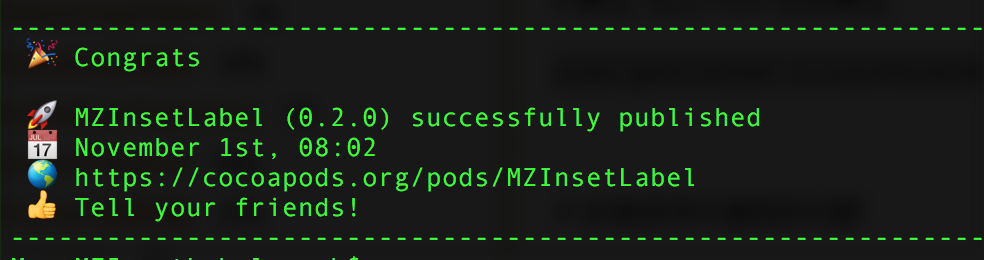
成功的效果图:
验证使用
1. 检查是否可以搜索到
1 | pod search MZInsetLabel |
如果搜索不到, 请执行
1 | pod setup |
2. 在项目中可以使用该项目
1 | pod 'MZInsetLabel', '~> 0.1.0' |
然后在你的测试项目中,执行 pod install 即可。
可能遇到的麻烦
1. 执行 pod trunk push *.podspec 时, 好久没反应?
这种情况, 大多数都是因为你的网络不给力造成的, 如果你确定你的网络没问题, 那么请翻墙.
2. 执 行 pod trunk push *.podspec 时报错?
报错信息:
1 | ERROR | [iOS] unknown: Encountered an unknown error (Simulator iPhone 4s is not available.) during validation. |
这个错误是因为, 更新了 xcode8 之后不再支持 ios7 的缘故.
解决方案(我的), 升级 cocoapods.
1 | sudo gem install -n /usr/local/bin cocoapods |
3. pod trunk push 失败
失败提示信息类似:
1 | Cloning into 'master'... |
解决方案: 更新 gem
1 | sudo gem update --system |
Git 命令行操作
1. 向远程 Repository 添加 tag
1 | git tag -m "注释" 0.0.1 |
执行后,可以看到 Github Repository 上会多一个对应的 tag 版本。
2.删除本地 Tag
1 | git tag --delete [TagName] |
如:
1 | git tag --delete 0.0.1 |
3. 删除远程 Tag
1 | git push --delete origin [TagName] |
如:
1 | git push --delete origin 0.0.1 |
在 Github 上面如果你不小心打错了 Release, 然后删除该 Release.
你会发现, tag 无法删除.使用上面方式妥妥的解决.
如果你删除 tag,想重新打一个相同的 tag,需要先删除本地的 tag,否则会失败。
扫码关注,你我就各多一个朋友~


